Table of Content
Software development continues to evolve and that evolution also comes with new challenges for teams that want to keep up with the advancement of the industry. Currently, one of these challenges is to configure and maintain the development environment. To make more complex and advanced software, more complicated and advanced tools are needed, which means that development environments are becoming progressively more convoluted and difficult to maintain; especially when working as a team, the situation of “it works on my machine” is becoming more and more common. These errors occur due to small differences in the environment configuration on each team member’s machine. This greater difficulty slows down the integration of new members to the development, increases the uncertainty when estimating times, and the probability that the programmers have to waste time resolving bugs related to the development environment.
Docker Dev Containers are an efficient and elegant solution to this problem, allowing developers to centralize the configuration of the development environment and share it among all team members.
“It works on my machine”
The phrase “It works on my machine” has become a famous phrase, almost a cliché, that developers and testers often hear. This seemingly innocuous statement not only points to a common problem in software development but also opens a Pandora’s box of underlying challenges that teams face when aligning development and production environments.
Typically in a project, each programmer develops locally. Since everyone is responsible for installing programs on their machine, updating versions, configuring libraries, etc., situations like this are not uncommon:
- Someone added a new library or changed the configuration of a project and did not document it.
- Some program or version on your machine is causing problems in the installation of the project
- Something that works on your local machine doesn’t work on the server
- Conflicting operating systems or system configurations cause certain parts of the code to behave differently across team member’s machines, making debugging complex and time-consuming.
- Someone new enters the project and you have to spend time explaining how to install everything you need.
These are some of the situations that developers can encounter with complex development environments. These kinds of errors are unpredictable and usually take a lot of time to solve since they can be generated by a lot of causes, leading to delays in the development process and causing developers to waste time even to the point of not achieving the goals on time. That’s why we are looking into a solution that will help us get rid of these kinds of errors and keep our team productive.
What is Docker?
As mentioned in Docker documentation, Docker is an open platform for developing, shipping, and running applications. Docker provides the ability to package and run an application in a loosely isolated environment called a container. The isolation and security let you run many containers simultaneously on a given host. Containers are lightweight and contain everything needed to run the application, so you don’t need to rely on what’s installed on the host. This is why containers are usually used to deploy applications since you don’t need to install all the dependencies on your server, instead, they are installed inside the container’s virtual environment and the application is run from there. You can share containers and be sure that everyone you share them with gets the same code that works in the same way.
What are Dev Containers?
Not all containers are used for deployment, the Dev Containers are a “plug and play” solution, they can be crafted to include all a developer needs to run an application and start working on the development right away. In other words, Dev Containers are Docker containers that encapsulate all the necessary tools for running and developing a software piece, such as Frameworks, compilers, libraries, and pre-configured services. This also allows the developers to be able to work on any machine even if it’s not their usual workstation, they just need to set up docker and start coding.
How to set up a Dev Container?
Now, we’ll discuss the steps to set up our first Dev Container. For this tutorial, we’ll use VS Code as our IDE, but this can also be achieved with InteliJ IDE. Keep in mind that there are other ways to set up containers like Dockerfiles or directly from the console using Docker CLI.
Prerequisites
- Docker
- VS Code
Start Docker
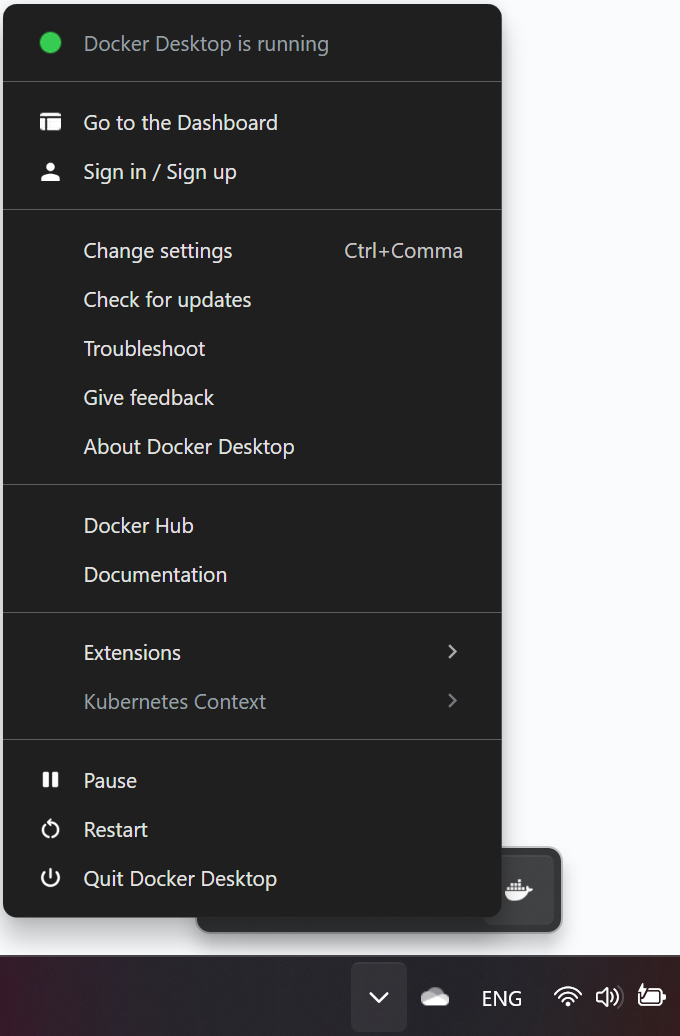
For this tutorial, you don’t need previous knowledge of Docker. You only need to install it and have it up and running before going to the next steps. To make sure Docker is running correctly, look at the activity tray and look for the whale Icon, or go to your terminal and write `docker -v` and it should show you the currently installed version. It may take a few minutes to start running after opening the application. If the icon is animated, it is still in the starting process. You can click the Icon and see the status.

Install Dev Containers Extension
This is the extension that will allow us to run VS Code inside a Docker container hence giving us the possibility of compiling and running our code with the tools installed inside said container instead of our local machine.

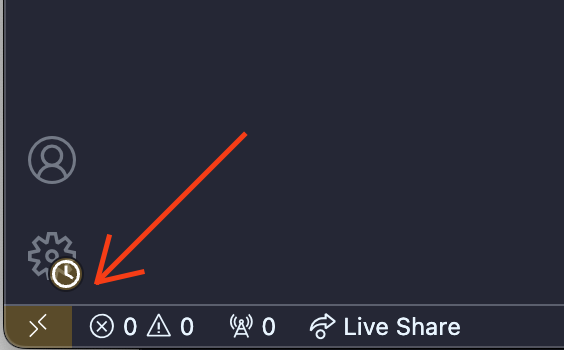
With the Dev Containers extension installed, you will see a new Status bar item at the far bottom left.

Create a devcontainer.json file
This file will hold the metadata used to configure our dev container. It should be stored in the root of our project under .devcontainer/devcontainer.json.
To better understand this file we can divide it into four parts:
1. Name and Image
Here we give our container a name and select the docker image it will be based on, we can use a pre-configured image or set up our own image adjusted to our needs. For now, let’s use a public image for running Typescript code. We will see how we can use our own Dockerfile later in this tutorial.
{
 “name”: “My Devcontainer”,
 "image": "mcr.microsoft.com/devcontainers/typescript-node:0-18",
}
2. Customizations
Here we can specify tool-specific properties. It is usually used to install the VS Code extensions we would like to use inside our Dev Container. For this example, we will specify that we want the code spell checker extension to be installed in our dev container.
{
 “name”: “My Devcontainer”,
 "image": "mcr.microsoft.com/devcontainers/typescript-node:0-18",  "customizations": {
 "vscode": {
    "extensions": ["streetsidesoftware.code-spell-checker"]
 }
  },
}
3. Ports Attributes
This section is used for port forwarding settings. Port forwarding is a Docker concept, this basically will allow us to communicate with the applications running inside our containers from our host machine.
{
 “name”: “My Devcontainer”,
 "image": "mcr.microsoft.com/devcontainers/typescript-node:0-18",  "customizations": {
 "vscode": {
    "extensions": ["streetsidesoftware.code-spell-checker"]
 }
  },

"forwardPorts": [3000],
}
4. Post Create Commands
In this section, we can specify commands to be run in our container after it is created. For example, we could run the npm init command to initialize a npm project.
{
 “name”: “My Devcontainer”,
 "image": "mcr.microsoft.com/devcontainers/typescript-node:0-18",  "customizations": {
 "vscode": {
    "extensions": ["streetsidesoftware.code-spell-checker"]
 }
  },

"forwardPorts": [3000],

"postCreateCommand": "npm init -y"
}
Now we have a complete devcontainer.json. Note that the only mandatory configuration in this file is to have an image specified in order to be able to build a container based on that image. The rest of the configuration is optional and you can add it depending on your needs.
Reopen the project in the container
Now that we have populated our devcontainer.json we can open the command palette and look for the command Dev Container: Reopen in Container

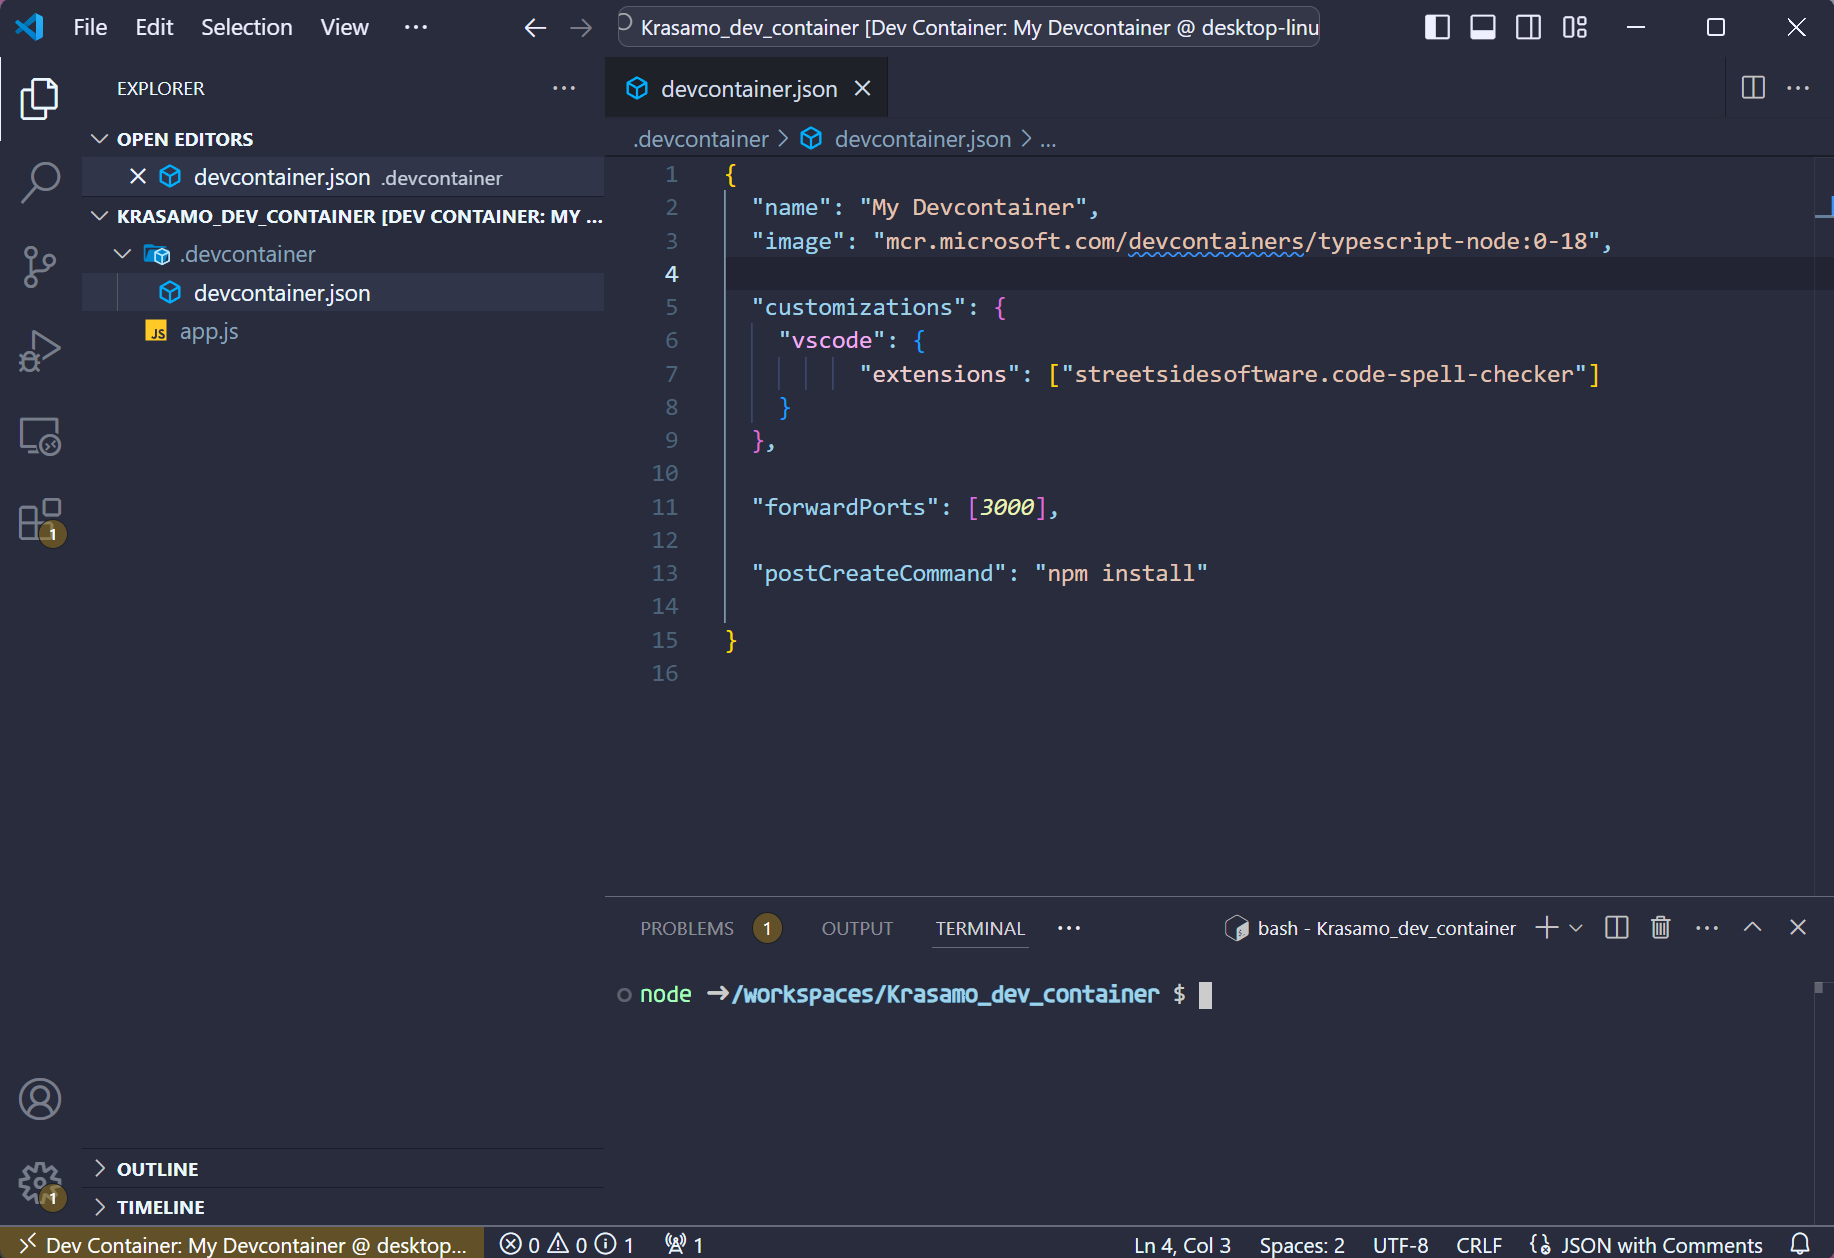
After running this command, when VS Code restarts, you’re now within a Node.js and TypeScript dev container with port 3000 forwarded and the Code spell checker extension installed. Once you’re connected, notice the indicator on the left of the Status bar to show you are connected to your dev container:

Now that we are inside our Dev Container we can start developing. From now on all the developers should code inside the Dev Container to make sure they are using the same development environment.
Using a Dockerfile
If you have knowledge of Docker and want to create your own Dockerfile you can do it, this way you can have a much more customized development environment that adjusts to your needs and preferences. The Dockerfile should also be inside the ./devcontainer folder. In the devcontainer.json file you would need to change the “image” attribute for the next:
{
  "build": { "dockerfile": "Dockerfile" },
}
Conclusion: Creating a seamless development experience
Today, we learned the value of using a tool to help us streamline and simplify the development process. In today’s fast-paced software development environment, the challenge of maintaining consistent development setups across team members can hinder productivity and lead to frustrating delays. Docker Dev Containers provide a robust solution by creating a uniform, isolated environment that can be shared across the team, ensuring that “it works on my machine” becomes a thing of the past. By centralizing the configuration of development environments, Dev Containers allow developers to spend less time troubleshooting environment issues and more time focusing on writing code. With the ease of setting up and using Docker Dev Containers, teams can foster a smoother, more reliable development process, accelerating collaboration and improving efficiency. Embracing this tool ultimately leads to a more predictable and seamless development experience, helping teams meet deadlines and deliver quality software with fewer obstacles.
References
https://www.docker.com/blog/streamlining-local-development-with-dev-containers-and-testcontainers-cloud/
https://docs.docker.com/get-started/docker-overview/
https://code.visualstudio.com/docs/devcontainers/create-dev-container
https://code.visualstudio.com/docs/devcontainers/tutorial


I completely agree that Docker dev containers can be a game-changer for teams. However, I think it’s worth mentioning that proper implementation and management of these containers require careful consideration and planning, especially in larger-scale environments. Devops consulting services can also be beneficial to ensure seamless integration and minimize potential bottlenecks.
I’m loving the enthusiasm for DevOps in your post! However, I do have some minor suggestions for improvement. You might want to consider mentioning the importance of containerization and how it benefits teams in terms of scalability and maintainability, especially when working with devops consulting companies that specialize in Docker adoption. Also, you could expand on the devcontainer.json file configuration a bit more for clarity. Keep up the great content!
Hey author, could you elaborate on containerization in DevOps outsourcing?
Containerization in DevOps outsourcing provides a standardized environment
for teams to collaborate and reduce “it works on my machine” issues.
I guess I’ll weigh in on this – containerization in DevOps outsourcing refers to using tools like Docker to create isolated environments that can be shared among team members. It’s supposed to help reduce configuration issues and make it easier for devs to work together. In the context of DevOps consulting, containerization can simplify setup and troubleshooting, allowing teams to focus on writing code rather than dealing with env-related headaches. That’s the basic idea, at least.
I’m familiar with Dev Containers as a solution to development environment configuration issues. Essentially, they’re a centralized way to manage development environments using Docker, allowing team members to work on consistent configurations across different machines. It’s like having a “plug and play” setup for development environments that can be easily shared among team members. I think the explanation in the blog post does a good job of highlighting their value in streamlining the development process. However, if you’re looking for more specific details on implementation, I’d suggest checking out some of the resources mentioned at the end of the post.
I’d like to offer some additional context to this post. It’s worth noting that creating a custom development environment with Dockerfiles is indeed a great way to boost productivity, but it may not be feasible for all teams. In such cases, leveraging containerization tools and implementing a DevOps strategy can simplify the process. Many companies now opt for devops consulting companies to streamline their development workflows. I’d be curious to see how this approach could be integrated with the Dockerfile in question.
I’ve read through your additional context and while I appreciate the insight, I’m not convinced that it necessarily aligns with the original post’s focus on Dockerfiles. The mention of devops consulting companies seems like a tangential point, and I’d be interested in seeing how their approach could be integrated with Dockerfiles rather than replacing them entirely.
It seems like you’re suggesting that containerization tools and DevOps strategies can simplify the process for teams who may not be able to create custom development environments with Dockerfiles. While this is undoubtedly true, I’m curious about the potential trade-offs in terms of customization and flexibility.
Can we discuss how devops consulting companies might enhance or modify the Dockerfile approach to better suit their clients’ needs?
While I appreciate the original post’s focus on Dockerfiles, I agree that exploring how devops consulting companies might enhance or modify this approach to suit clients’ needs is a worthwhile discussion. It could also provide insight into potential trade-offs with customization and flexibility.
In the context of devops outsourcing, leveraging the expertise of these consulting companies could streamline the process for teams who cannot create custom development environments using Dockerfiles. However, it’s essential to consider how their approach might integrate with Dockerfiles rather than replacing them entirely.
I can see how integrating Dockerfiles with DevOps consulting strategies could simplify development workflows, but wouldn’t that just add another layer of complexity?
I’ve been following DevOps trends for a while now, and I must say Docker’s potential is undeniable. However, as someone who’s worked extensively in devops consulting, I’m still not convinced it’s the silver bullet some people make it out to be.