Introduction
In order to develop an application in any language or framework, we all know it’s not enough just to have a well-built UI and UX. In the vast majority of cases, applications not only store information within themselves or the device, but necessarily depend on a backend as well.
Almost all applications make use of an API to handle data—whether to send, modify, or receive it—and a large part of the operation and usability of an application relates to correct or incorrect communication with the services. When the existing communication is carried out with REST services, the practices that make that communication appropriate could be defined as best practices for RESTful communication. In this article, we will examine best practices when working with Flutter.

What is REST?
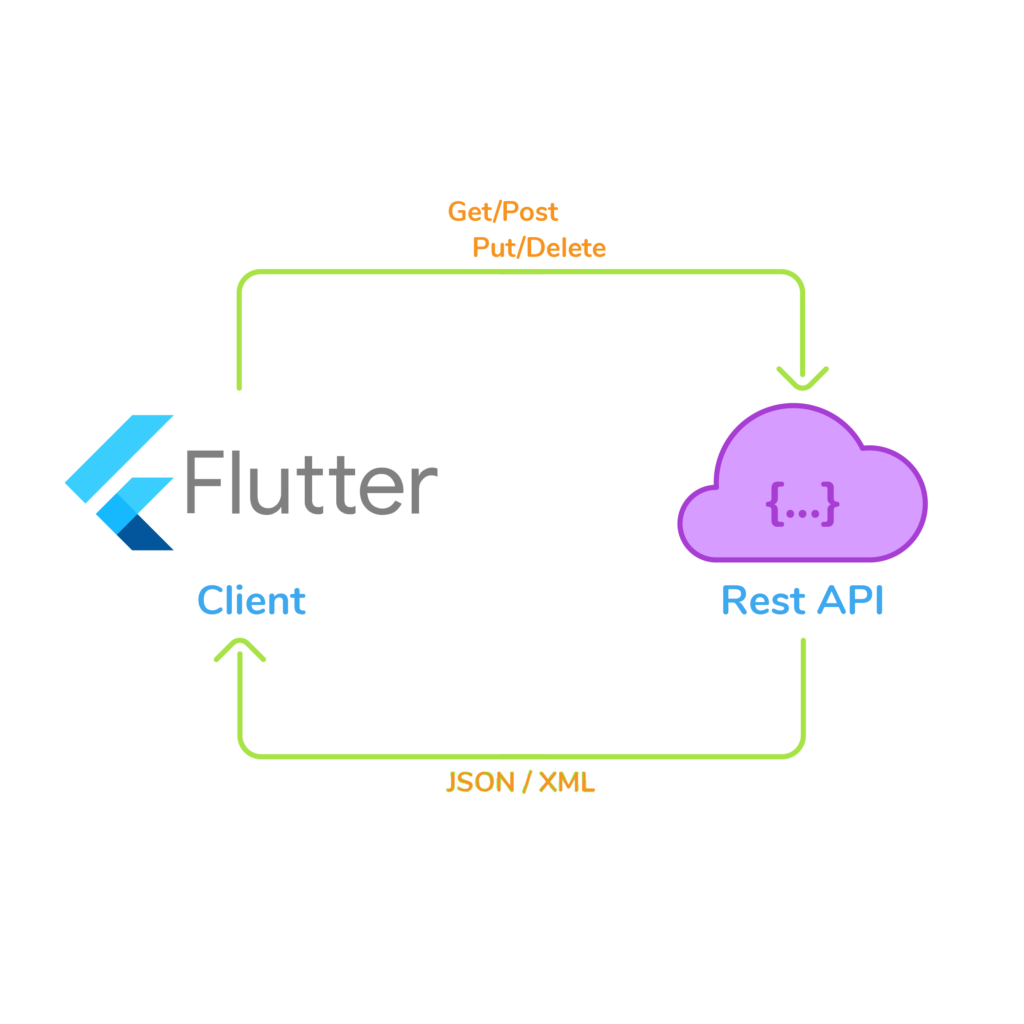
When we talk specifically about developing in Flutter, these best practices can also guarantee that our application has an optimal functioning in its entirety, since it will have an optimal handling of the information. But first, we must understand REST (representational state transfer). Simply put, REST describes any interface between systems that uses HTTP to handle data.
REST works as a client-server architecture. It doesn’t have state (session state), it can cache resources to improve performance, and it follows the same rules between all components. REST is layered, and it provides code on demand. Its primary identifiers are “get, post, put, patch, delete.”
Recommendations for RESTful Communication
1. Use Format and Information Correctly
It is highly recommended to select a unique URL address and set it as the base address in a class that holds the necessary constants to communicate with the server. To achieve this, the Dio Flutter Package (https://pub.dev/packages/dio) gives us an example, as the following extract from its docs shows:
Dio dio = new Dio(); // with default Options

// Set default configs
dio.options.baseUrl = "https://www.xx.com/api";
dio.options.connectTimeout = 5000; //5s
dio.options.receiveTimeout = 3000;

// or new Dio with a BaseOptions instance.
BaseOptions options = new BaseOptions(
    baseUrl: "https://www.xx.com/api",
    connectTimeout: 5000,
    receiveTimeout: 3000,
);
Dio dio = new Dio(options);
The server must then be provided with the required information so it can satisfy the request. In almost all cases, this will include the client’s authentication information, where the exchange formats are usually XML and JSON (for REST services). Currently, in most cases, Flutter uses JSON, perhaps because it is faster (as it requires fewer bytes for transit) and is designed to exchange information.
Below you’ll see what a JSON looks like. When communicating with REST services, this is what a Flutter application would receive to convert later.
{
		"firstValue" : "string",
    "secondValue" : 1,
    "thirdValue" : 1
}
2. Make Use of Existing Resources
To make a request in the most efficient way, it is wise to consider the different packages that the Flutter team and the community have already provided, as these contain functions and classes that facilitate consuming HTTP resources. Such is the case with the HTTP package (https://pub.dev/packages/http) created by the Dart developers, as well as the Dio package (https://pub.dev/packages/dio) created by the Flutter Chinese Network. You can find these and all other packages at pub.dev.

Other packages can also be chosen, but no matter which one you choose, it is always prudent to check on which operating systems the package is compatible with, how many pub points it has received, and how stable it is. The package documentation will provide examples of how to carry out requests. Again, from the docs (this time for an HTTP package), a request could look like this:
import 'package:http/http.dart' as http;

var url = Uri.parse('https://example.com/whatsit/create');
var response = await http.post(url, body: {'name': 'doodle', 'color': 'blue'});
print('Response status: ${response.statusCode}');
print('Response body: ${response.body}');

print(await http.read('https://example.com/foobar.txt'));
3. Implement Asynchronous Programming
The moment an application in Flutter starts communicating with the server, we are automatically in the asynchronous field. Why? Because the response to every request will be available at some point in the non-immediate future. The use of async and await keywords on Flutter is not only highly recommended but practically essential. Using them guarantees that the response is indeed asynchronous and that we can read the required information or send the specified information. Otherwise, the application would try to continue working without “awaiting” a response from the server. When an operation is asynchronous, it returns an object that represents a delayed calculation, known in Flutter as a “future.” Here is a simple example of an asynchronous function, from the official site dart.dev:
Future<String> createOrderMessage() async {
  var order = await fetchUserOrder();
  return 'Your order is: $order';
}
When using futures, every function is identified with the keyword async; that’s how it becomes asynchronous. To wait for a value, each request must be preceded by the keyword await. In this way, the application will always wait until it has fetched the needed data before proceeding with further operations. Finally, it is also recommended that a time limit be established for each operation; in this case, an error or exception message is received if the time limit is exceeded.
4. Handle Authentication
We should always opt to develop applications that use API keys, even if they are not important to whomever handles the information. This should especially be considered with regard to protecting resources, since the number of requests per client can be limited in this way. I remember doing tests with a free API service once. At some point, I reached my limit and wasn’t able to do any more requests. This is certainly acceptable, especially if an application we develop consumes our own API.

On the other hand, speaking of authentication, it is always better to implement login and registration. It is also advisable to use a scheme that involves security tokens, so-called “bearer tokens.” When this is incorporated, the application should work programmatically with the generated token whenever authentication is required. It might be said that this is a backend topic, but we all know that in most cases, both backend and frontend/mobile belong to the same team or company.
5. Appropriate Representative Entities Should Handle Information
When making HTTP requests, one recommendation is to create something like a template to correctly handle all the information received. JSONs contain organized information; to use this information effectively, a class must be designed to serve as a model (whose variables are either of a defined type or dynamic, depending on what is received). This class must be able to receive the data and store it in an object. It will then be necessary to convert the received string into a more manipulable representation of a JSON. There are different ways to achieve this. One recommendation is to use either the package offered by Google, called json_serializable, or the Flutter library, called dart:convert.
When it comes to correctly converting the data that the Flutter application receives, we’re not just talking about good conventions. We must also consider how we can best convert the data in order to be able to use it most easily within our app. As previously stated, creating a model is essential. Before that, however, we must make sure we prepare the field to manage calculated values so they can be sent to the constructor of the class. To achieve this, we use a factory constructor. Let’s say we want to create a model for the JSON that was shown in a previous example. Using Flutter’s dart:convert library, your class could be something like:
import 'dart:convert';

Room roomFromJson(String str) => Room.fromJson(json.decode(str));

String roomToJson(Room data) => json.encode(data.toJson());

class Room {
  Room({
    this.firstValue,
    this.secondValue,
    this.thirdValue,
  });

  String firstValue;
  int secondValue;
  int thirdValue;

  factory Room.fromJson(Map<String, dynamic> json) => Room(
    firstValue: json["firstValue"],
    secondValue: json["secondValue"],
    thirdValue: json["thirdValue"],
  );

  Map<String, dynamic> toJson() => {
    "firstValue": firstValue,
    "secondValue": secondValue,
    "thirdValue": thirdValue,
  };
}
After receiving the data from a request and storing it in a model like this, you will be able to handle everything in the future without any unnecessary troubles. With a model such as this, the data can be used again later within the widgets.
6. Consider Using a Controller and Always Handle Errors
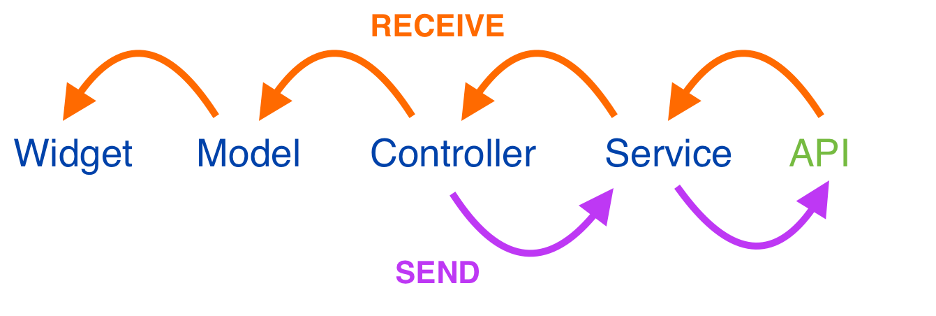
Sometimes it will be necessary to use streams to constantly update the information received. A recommended approach to simplify this practice is to use a state management package such as Bloc, GetX, or Provider (among others). You can create a class like a controller that knows how to inform the widgets if the information is being loaded, if the process has been completed, or if there has been an error. (If there has been an error, everything necessary must always be implemented so that the application warns in the most concrete way about the status of its request, usually done with try and catch.) Likewise, it should be shown visually whether or not it was possible to receive or handle the requested data.
7. Always Modularize
Last, but not least, we all know that the goal of all the previous practices is that the user can experience friendly interaction with the data the application is handling. Once the JSON information has been received and saved in a model, the information should be correctly displayed in the widget. But be careful: Everything must be modular. That is, there should be no logic that does not belong to the widgets in the class that you want to render. Also, one should not manage session requests or communicate directly with the API layer in the rendered class. (See again the image above.)
Conclusion
By following these practices, we can ensure better communication with our servers, and obviously, this will be positive for our applications themselves. In this article, I have presented a number of different points and nuances that will help you better plan your application when it comes to receiving, sending, or modifying data in communication with a REST service. All of these practices have the common goal of ensuring that our end users have a truly satisfactory experience with any application we develop.






I feel you, converting JSON to models can be super tedious! Maybe exploring Flutter best practices for data parsing would help?
I thoroughly enjoyed your article on RESTful communication in Flutter! Your explanation of asynchronous programming was spot-on, and I appreciate the inclusion of the example from dart.dev. One minor suggestion: it might be beneficial to provide a brief note on best practices for handling errors when working with futures, such as using try-catch blocks or error callbacks. This would add an extra layer of robustness to the code. Overall, great job!